通过NIO编程的序列图和源代码分析来熟悉相关的概念。
NIO服务端
NIO服务端序列图
NIO服务端通信序列图如图1所示。
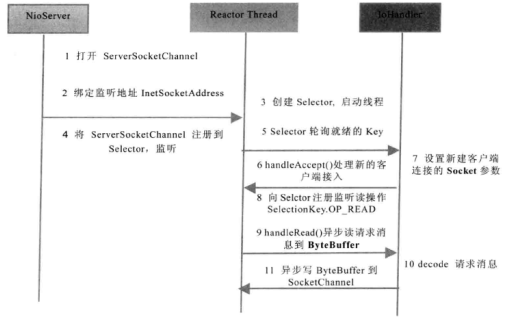
图1 NIO服务端通信序列图
NIO服务端的主要创建过程
打开ServerSocketChannel,用于监听客户端的连接,它是所有客户端连接的父管道
|
|
绑定监听端口,设置连接为非阻塞模式
|
|
创建Reactor线程,创建多路复用器并启动线程
|
|
将ServerSocketChannel注册到Reactor线程的多路复用器Selector,监听ACCEPT事件
|
|
多路复用器在线程run方法的无限循环体内轮询准备就绪的key
|
|
多路复用器监听到新的客户端接入,处理新的接入请求,完成TCP三次握手,建立物理链路
|
|
设置客户端链路为非阻塞模式
|
|
将新接入的客户端连接注册到Reactor线程的多路复用器上,监听读操作,读取客户端发送的网络消息
|
|
异步读取客户端请求消息到缓冲区
|
|
注意:如果发送区TCP缓冲区满,会导致写半包,此时,需要注册监听写操作位,循环写,直到整个包消息写入TCP缓冲区。对于这些内容此次暂不赘述,后续Netty源码分析章节会详细分析Netty的处理策略。
NIO创建的TimeServer源码分析
我们将在TimeServer例程中给出完整的NIO创建的时间服务器源码。
代码清单1 NIO时间服务器TimeServer
下面对NIO创建的TimeServer进行简单分析。第8~15行设置监听端口。第16~17行创建了一个被称为MultiplexerTimeServer的多路复用器,它是个一个独立的线程,负责轮询多路复用器Seletor,可以处理多个客户端的并发接入。现在我们继续看MultiplexerTimeServer的源码。
代码清单2 NIO时间服务器MultiplexerTimeServer
由于这个类相比于传统的Socket编程稍微复杂一些,在此我们进行详细分析,我们从如下几个关键步骤讲解多路复用处理类:
(1) 14-26行为构造方法,在构造方法中进行资源初始化,创建多路复用器Selector、ServerSocketChannel,对Channel和TCP参数进行配置,例如将ServerSocketChannel设置为异步非阻塞模式,它的backlog设置为1024。系统资源初始化成功后将ServerSocketChannel注册到Selector,监听SelectionKey.OP_ACCEPT操作位;如果资源初始化失败,例如端口被占用则退出
(2) 39-61行在线程的run方法的while循环体中循环遍历selector,它的休眠时间为1S,无论是否有读写等事件发生,selector每隔1S都被唤醒一次,selector也提供了一个无参的select方法。当有处于就绪状态的Channel时,selector将返回就绪状态的Channel的SelectionKey集合,我们通过对就绪状态的Channel集合进行迭代,就可以进行网络的异步读写操作
(3) 76-83行处理新接入的客户端请求消息,根据SelectionKey的操作位进行判断即可获知网络事件的类型,通过ServerSocketChannel的accept接收客户端的连接请求并创建SocketChannel实例,完成上述操作后,相当于完成了TCP的三次握手,TCP物理链路正式建立。注意,我们需要将新创建的SocketChannel设置为异步非阻塞,同时也可以对其TCP参数进行设置,例如TCP接收和发送缓冲区的大小等,作为入门的例子,例程没有进行额外的参数设置
(4) 84-109行用于读取客户端的请求消息,首先创建一个ByteBuffer,由于我们事先无法得知客户端发送的码流大小,作为例程,我们开辟一个1M的缓冲区。然后调用SocketChannel的read方法读取请求码流,注意,由于我们已经将SocketChannel设置为异步非阻塞模式,因此它的read是非阻塞的。使用返回值进行判断,看读取到的字节数,返回值有三种可能的结果:
返回值大于0:读到了字节,对字节进行编解码;
返回值等于0:没有读取到字节,属于正常场景,忽略;
返回值为-1:链路已经关闭,需要关闭SocketChannel,释放资源。
当读取到码流以后,我们进行解码,首先对readBuffer进行flip操作,它的作用是将缓冲区当前的limit设置为position,position设置为0,用于后续对缓冲区的读取操作。然后根据缓冲区可读的字节个数创建字节数组,调用ByteBuffer的get操作将缓冲区可读的字节数组拷贝到新创建的字节数组中,最后调用字符串的构造函数创建请求消息体并打印。如果请求指令是”QUERY TIME ORDER”则把服务器的当前时间编码后返回给客户端,下面我们看看如果异步发送应答消息给客户端。
(5) 111-119行将应答消息异步发送给客户端,我们看下关键代码,首先将字符串编码成字节数组,根据字节数组的容量创建ByteBuffer,调用ByteBuffer的put操作将字节数组拷贝到缓冲区中,然后对缓冲区进行flip操作,最后调用SocketChannel的write方法将缓冲区中的字节数组发送出去。需要指出的是,由于SocketChannel是异步非阻塞的,它并不保证一次能够把需要发送的字节数组发送完,此时会出现“写半包”问题,我们需要注册写操作,不断轮询Selector将没有发送完的ByteBuffer发送完毕,可以通过ByteBuffer的hasRemain()方法判断消息是否发送完成。此处仅仅是个简单的入门级例程,没有演示如何处理“写半包”场景,后续的章节会有详细说明。
使用NIO创建TimeServer服务器完成之后,我们继续学习如何创建NIO客户端。首先还是通过时序图了解关键步骤和过程,然后结合代码进行详细分析。
NIO客户端
NIO服务端序列图
NIO客户端端通信序列图如图2所示。

图2 NIO客户端通信序列图
NIO客户端的主要创建过程
打开SocketChannel,绑定客户端本地地址(可选,默认系统会随机分配一个可用的本地地址)
设置SocketChannel为非阻塞模式,同时设置客户端连接的TCP参数
异步连接服务端
判断是否连接成功,如果连接成功,则直接注册读状态位到多路复用器中,如果当前没有连接成功(异步连接,返回false,说明客户端已经发送sync包,服务端没有返回ack包,物理链路还没有建立)
向Reactor线程的多路复用器注册OP_CONNECT状态位,监听服务端的TCP ACK应答
创建Reactor线程,创建多路复用器并启动线程
多路复用器在线程run方法的无限循环体内轮询准备就绪的Key
接收connect事件进行处理
判断连接结果,如果连接成功,注册读事件到多路复用器
注册读事件到多路复用器
异步读客户端请求消息到缓冲区
对ByteBuffer进行编解码,如果有半包消息接收缓冲区Reset,继续读取后续的报文,将解码成功的消息封装成Task,投递到业务线程池中,进行业务逻辑编排
将POJO对象encode成ByteBuffer,调用SocketChannel的异步write接口,将消息异步发送给客户端
通过序列图和关键代码的解说,相信大家对创建NIO客户端程序已经有了一个初步的了解,下面就跟随着我们的脚步,继续看看如何使用NIO改造之前的时间服务器客户端TimeClient吧。
NIO创建的TimeClient源码分析
代码清单3 NIO时间服务器客户端 TimeClient
通过创建TimeClientHandle线程来处理异步连接和读写操作。
代码清单4 NIO时间服务器客户端 TimeClientHandle
与服务端类似,我们通过对关键步骤的源码进行分析和解读,让大家深入了解如何创建NIO客户端以及如何使用NIO的API。
(1) 8-19行构造函数用于初始化NIO的多路复用器和SocketChannel对象,需要注意的是创建SocketChannel之后,需要将其设置为异步非阻塞模式。就像在2.3.3章节中所讲的,我们可以设置SocketChannel的TCP参数,例如接收和发送的TCP缓冲区大小
(2) 28-33行用于发送连接请求,作为示例,连接是成功的,所以不需要做重连操作,因此将其放到循环之前。下面我们具体看看doConnect的实现,代码跳到第116-123行,首先对SocketChannel的connect()操作进行判断,如果连接成功,则将SocketChannel注册到多路复用器Selector上,注册SelectionKey.OP_READ,如果没有直接连接成功,说明服务端没有返回TCP握手应答消息,这并不代表连接失败,我们需要将SocketChannel注册到多路复用器Selector上,注册SelectionKey.OP_CONNECT,当服务端返回TCP syn-ack消息后,Selector就能够轮询到这个SocketChannel处于连接就绪状态
(3) 34-67行在循环体中轮询多路复用器Selector,当有就绪的Channel时,执行第59行的handleInput(key)方法,下面我们就对handleInput方法进行分析。
(4) 跳到第68行,我们首先对SelectionKey进行判断,看它处于什么状态。如果是处于连接状态,说明服务端已经返回ACK应答消息,我们需要对连接结果进行判断,调用SocketChannel的finishConnect()方法,如果返回值为true,说明客户端连接成功,如果返回值为false或者直接抛出IOException,说明连接失败。在本例程中,返回值为true,说明连接成功。将SocketChannel注册到多路复用器上,注册SelectionKey.OP_READ操作位,监听网络读操作。然后发送请求消息给服务端,下面我们对doWrite(sc)进行分析。代码跳到110行,我们构造请求消息体,然后对其编码,写入到发送缓冲区中,最后调用SocketChannel的write方法进行发送,由于发送是异步的,所以会存在“半包写”问题,此处不再赘述。最后通过hasRemaining()方法对发送结果进行判断,如果缓冲区中的消息全部发送完成,打印”Send order 2 server succeed.
(5) 代码返回第80行,我们继续分析下客户端是如何读取时间服务器应答消息的。如果客户端接收到了服务端的应答消息,则SocketChannel是可读的,由于无法事先判断应答码流的大小,我们就预分配1M的接收缓冲区用于读取应答消息,调用SocketChannel的read()方法进行异步读取操作,由于是异步操作,所以必须对读取的结果进行判断,这部分的处理逻辑已经在2.3.3章节详细介绍过,此处不再赘述。如果读取到了消息,则对消息进行解码,最后打印结果。执行完成后将stop置为true,线程退出循环
(6) 线程退出循环后,我们需要对连接资源进行释放,以实现“优雅退出”。60-66行用于多路复用器的资源释放,由于多路复用器上可能注册成千上万的Channel或者pipe,如果一一对这些资源进行释放显然不合适。因此,JDK底层会自动释放所有跟此多路复用器关联的资源,JDK的API DOC如下:
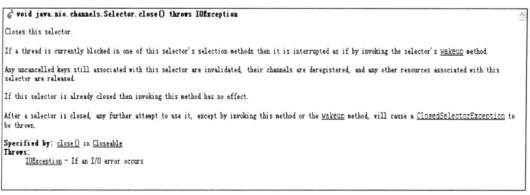
图3 多路复用器Selector的资源释放
到此为止,我们已经将时间服务器通过NIO完成了改造,并对源码进行了分析和解读。
运行结果
下面分别执行时间服务器的服务端和客户端,看执行结果。
服务端执行结果:

图4 NIO时间服务器客户端执行结果
客户端执行结果:

图5 NIO时间服务器客户端执行结果
通过源码对比分析,我们发现NIO编程难度确实比同步阻塞BIO大很多,我们的NIO例程并没有考虑“半包读”和“半包写”,如果加上这些,代码将会更加复杂。NIO代码既然这么复杂,为什么它的应用却越来越广泛呢,使用NIO编程的优点总结如下:
1) 客户端发起的连接操作是异步的,可以通过在多路复用器注册OP_CONNECT等待后续结果,不需要像之前的客户端那样被同步阻塞;
2) SocketChannel的读写操作都是异步的,如果没有可读写的数据它不会同步等待,直接返回,这样IO通信线程就可以处理其它的链路,不需要同步等待这个链路可用;
3) 线程模型的优化:由于JDK的Selector在Linux等主流操作系统上通过epoll实现,它没有连接句柄数的限制(只受限于操作系统的最大句柄数或者对单个进程的句柄限制),这意味着一个Selector线程可以同时处理成千上万个客户端连接,而且性能不会随着客户端的增加而线性下降,因此,它非常适合做高性能、高负载的网络服务器。
JDK1.7升级了NIO类库,升级后的NIO类库被称为NIO2.0,引人注目的是Java正式提供了异步文件IO操作,同时提供了与Unix网络编程事件驱动IO对应的AIO,下面的2.4章节我们学习下如何利用NIO2.0编写AIO程序,我们还是以时间服务器为例进行讲解。